IWCS 2014 – Optical Surface Inspection with Accurate Diameter Measurement
November 14, 2014
IWCS 2016 – Print Length Verification for Cable
October 6, 2016IWCS 2015 – Optical Wrap Defect Inspection for Cable
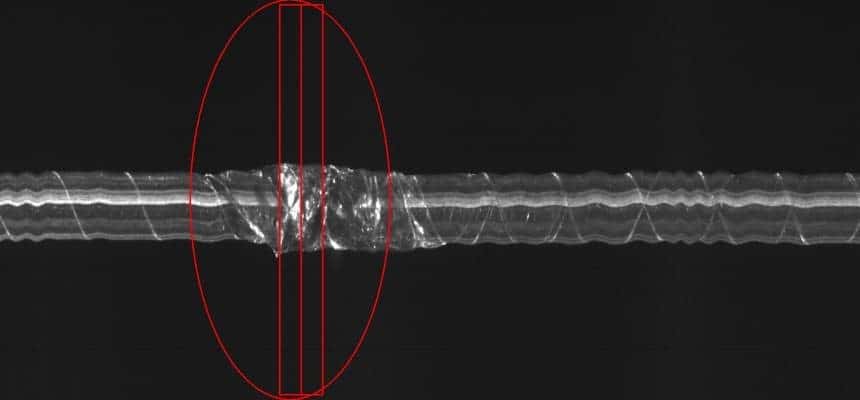
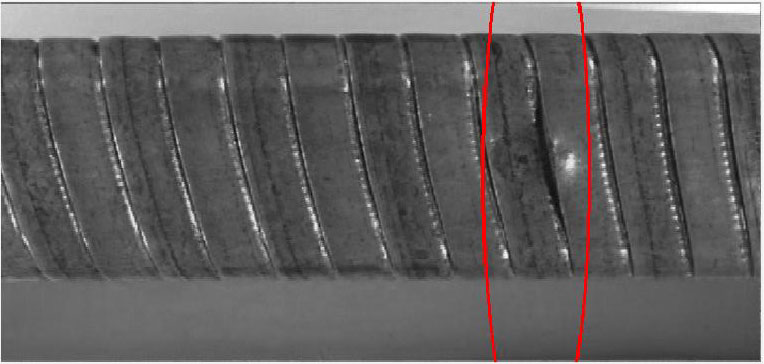
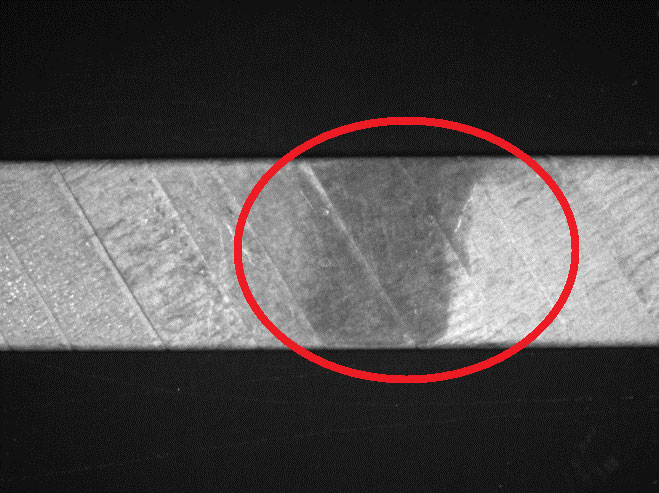
Figure 4. Tape Wrinkle
Optical Wrap Defect Inspection for Cable
Mr. Craig Girdwood, Mr. Andrew McCloskey
Taymer International Inc., Markham, Ontario, Canada, +1-905-479-2614
Abstract
The optical wrap defect inspection system significantly improves the quality control of wrapped cable. The surface and wrapping structure of the cable is continuously monitored by a machine vision system at production line speed. The wrap surface is able to be viewed live and/or recorded for 100% of the cable length. Surface and wrapping defects are identified, and images of the defects are recorded together with position information. Wrapping information including wrapping angle and overlap percentage can be monitored for changes. This technology improves the quality of the cable produced and prevents defective products from reaching the customer.
Introduction
A critical quality issue created during the production of wrapped cable is surface defects and wrapping defects. Potential surface defects include scratches or holes, and potential wrapping defects include uneven wrapping, incorrect wrapping angle, tape peeling and tape tears. These defects are not only a cosmetic problem, but they can lead to the core being exposed to the surroundings, resulting in short circuits and failure of equipment. By identifying and detecting these defects during the production process, immediate corrective action is able to be performed and defective sections of product can be repaired or discarded. Utilizing the constant and immediate feedback from the machine, operators and process engineers are able to pinpoint the root cause of the defects.
The Wrap Defect Inspection System utilizes one or more high speed cameras capturing real-time images of wrapped cable surfaces. The Wrap Inspector software is able to accurately measure wrapping distance and angle, as well as determine both the type and size of a wide range of surface defects and wrapping defects. Surface and wrapping defects as small as 0.1mm can be detected and an alarm triggered. When a defect is detected a digital image is enhanced, magnified and displayed on a remote monitor, enabling the operator to verify the defects. This allows operators to determine the type of defect, to identify false positives (i.e. a water droplet), or even detect surface blemishes (i.e. surface discoloring, scratches).
The wrapping angle and distance measurements for the entire cable are saved to a database along with a record of any surface or wrapping defect information. The defect information includes defect type, size and location on the cable in meters or feet. This allows defects to be isolated quickly by operators after production is completed.
The Wrap Inspector system is able to be easily integrated into existing production lines and performs well for various types of wrapped cables and convoluted armoring. The Wrap Inspector system makes sure that any problems are discovered prior to any defective products being sent to customers.
The lifetime of the lights can be over 50,000 hours of usage and they are the only consumable part.
Current Defect Detection Technique Limitations
Laser Diameter Gauges
A laser diameter gauge is used to detect bulges, neck-downs. The machine uses a laser and shadow technology to measure the diameter of the cable. The diameter measurement is extremely accurate and can be used to classify bulges or neck-downs. However, there is no way to truly know if the defect detected is an actual defect. For example, a dust particle or water droplet on the cable would increase the diameter measurement, resulting in a false positive.
Spark Tester
A spark tester is equipment that can be used to detect pinhole-type defects. The machine creates a spark when there is a pinhole that exposes the core of the cable – conductive metal. However, if a pinhole does not expose the core, the spark is not created. But the pinhole that is not a through hole is still a defect since over time, the pinhole could expand and expose the core of the cable. As well, for products without a core (pipe, hose, tubing) or products without a conducting core (fiber optic cable) spark testers are not applicable.
Vision Systems
Prior configurations of surface defect detection systems were unable to identify and measure convolutions of the product. These systems were limited to ignoring the convolutions to identify significant defects such as pin holes or significant bulges or shape changes. The wrap inspection system has been improved with additional image processing software and alternative camera configurations that identifies the wrapped cable profile and can measure parameters and detect variations in the wrapping that are considered defects.
Machine Vision Inspection System
Optical Mechanical Design
The wrap defect inspection system consists of one or more high resolution cameras and adequate lighting to capture images of cable moving at speeds more than 1200 feet (400 meters) per minute.
Using multiple cameras 360 degree coverage of the cable surface can be achieved. The system produces high quality images at these speeds with a very high frame rate. The frame rate is synchronized with an encoder and speed algorithm.
The lighting varies depending on the application. The factors in consideration are the reflectivity of the material, surface profile, color, line speed and camera type.
To ensure consistency in the images, the setup features an enclosure to prevent ambient lighting, outside particles, etc from affecting the results. Vibration of the cable is minimized by cable guides, preventing images from being out of focus.
An advanced algorithm is used to process the images for cable wrap inspection. A typical algorithm is capable of detecting surface and wrapping defects such as scratches, holes, uneven wrapping, incorrect wrapping angle, tape peeling and tape tears. The algorithm requires analysis of the pixels of the image and grouping them for further interpretation.
If a defect is detected, an alarm will notify your operator and an error report is saved to the ongoing data log. The defect will also show up on the display for operators to clarify.
Improving Quality Assurance
Suitable for any type of Products
Since the surface defect detection system with accurate diameter measurement uses machine vision, it is able to be used inspect the surface for many types of wrapped products or convoluted profiles. It is the most thorough method of detecting wrapping and surface flaws available and the advanced algorithm can help classify the type of defects accordingly.
Reduce Defects
The system can provide the operator with a view of current surface images as well as both the most recent defects with defect dimensions and the current cable diameter. This continuous stream of real time information – especially failure data – allows the operator to isolate the causes of wrap imperfections. Identifying when and how a defect occurs will allow the technical staff to learn the root cause of defects and reduce their occurrences.
Quality Assurance
The system will continuously and monitor the wrapping of the cable for both overlap distance and wrapping angle, the measurements can be recorded for later analysis. Images of wrapping and surface defects are captured and saved to a hard disk for use in quality reports. The Wrap Inspector system’s display makes it easy for engineering and production supervisors to examine potential defects without having to see the defect on the actual cable itself. Defect images are saved together with location information allowing your operators to quickly find and eliminate defects before they reach your customers or fail in the field.
Limitations
There are a few limitations to the wrap defect inspection system.
- Sometimes significantly different wrapping types will require adjustment to the optical setup or software changes.
- Since the camera is looking at the surface, water droplets/ grease/ dust particles will be detected as defects by the system. Generally, this can be fixed with a well-placed air wipe. Alternatively, the system sensitivity can be decreased, which may result in some of the smaller defects passing through the filter.
Test Results
The Wrap Defect Inspection system is a modified version of the Surface Inspection system that is used in numerous production lines around the world to detect surface defects on wire and cable.
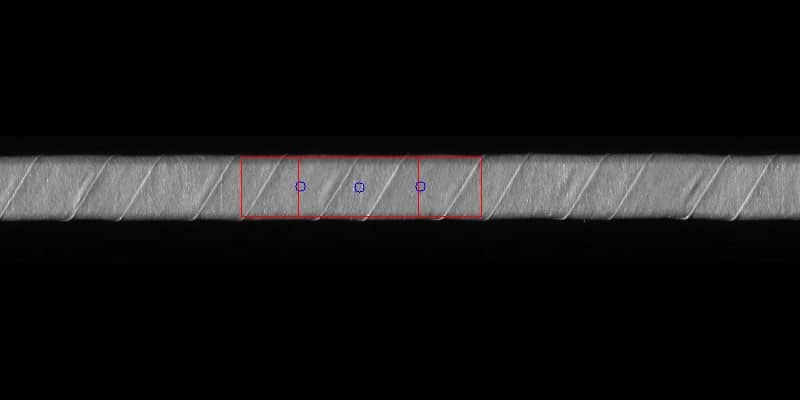
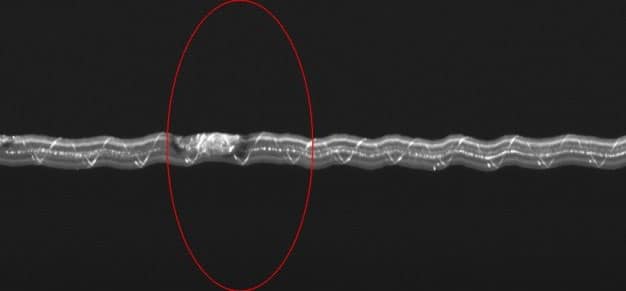
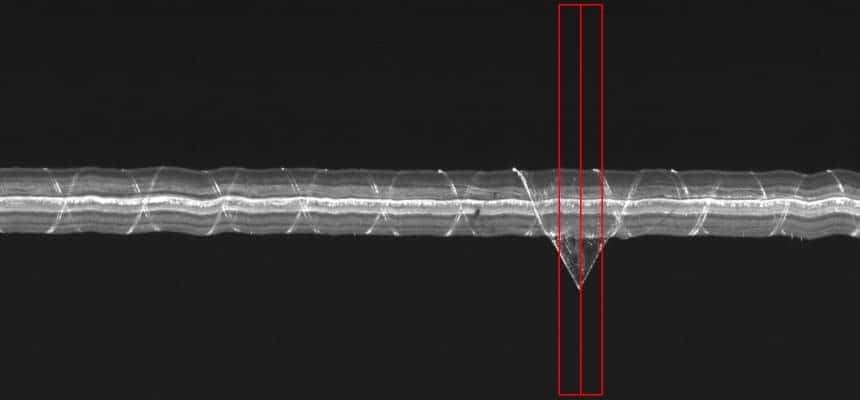
Some samples images of defects and wrap measurements can be seen below from Figure 1 to 6.

Conclusions
With a wrap defect inspection system, imperfections in the wrapped cable surface will be detected and the cable is ensured to be wrapped correctly able to show overlap distance and angle. The system provides several benefits.
- Suitable for any type of wrapped wire/ cable and convoluted armoring
- Ensure the customer will not get defective products improving customer relationship and confidence
- Reduce rework and eliminate cable waste resulting in material cost and labor cost
- Assist in internal improvement to production process to reduce defects
- Ensure cable overlap
Contact us today if you would like to discuss Taymer’s Optical Wrap Defect Inspection technology further.


