IWCS 2018 – High Speed Lump and Neck-down Detection with Accurate Diameter Measurement
November 10, 2018
COVID-19: TAYMER REMAINS OPEN
March 24, 2020IWCS 2019 – Print Verification with Anti-Twist Measures
Print Verification System for Wire and Cable with Anti-Twist Measures
Mr. Craig Girdwood, Mr. Max Fondyga
Taymer International Inc., Markham, Ontario, Canada, +1-905-479-2614
Abstract
The use of the Print Verification (PV) system in detecting print defects greatly improves quality assurance on wire and cable. Print defects on the jacket are continuously detected by a machine vision system at production line speed. Images of the defects are processed and saved. This technology improves the print quality of the cable produced, thereby preventing defective product from reaching the end customer
Introduction
Print defects are generally the most common single source of defects in power cable and fiber optic cable manufacturing facilities.
Incorrect messages, print smudging, faded print, and missing print are all print defects that should not be present on good quality product. These types of defects are not only cosmetic problems as they can also lead to misuse of the cable when it reaches the end-user. By being able to detect these defects, corrective actions can be taken at the production level and allow for reprinting or discarding of defective pieces.
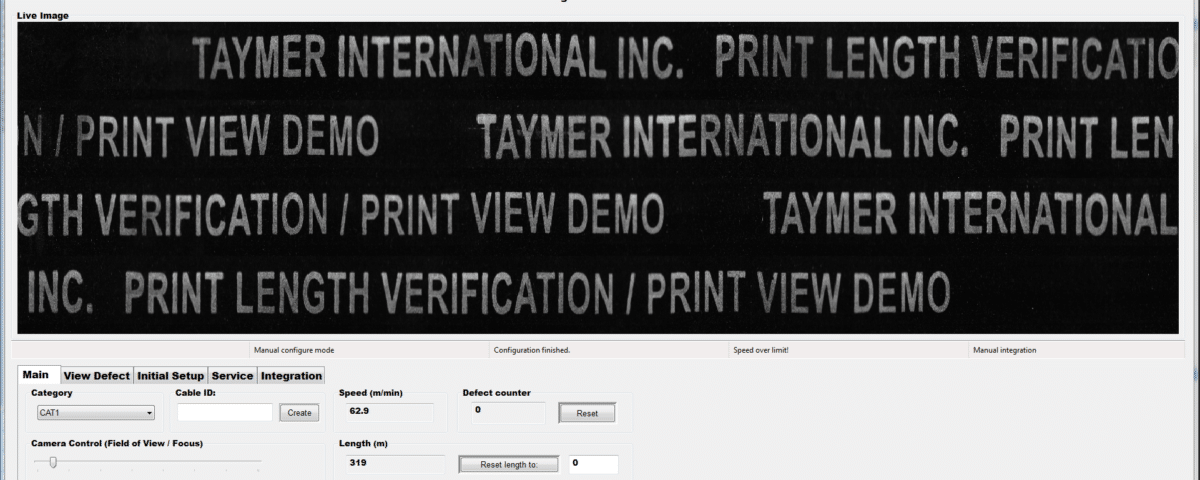
The PV system uses machine vision technology to analyze, isolate, and identify print defects. The system runs inline and saves all defect image data, including length and defect size, in a database. The camera is generally positioned close to the printer to simplify print legend identification and print location on the cable. Images of the print legend are captured and processed through high speed image processing algorithms and character verification techniques. Any illegible or incorrect print legends are detected by the software, alerting the operator to take corrective action. The defective print images are stored together with length information, allow for further analysis or report generation.
The alert provides operators with instant feedback on current printing conditions resulting in not only corrective actions, but more importantly allowing the operator and process engineers to identify and reduce the root causes of print defects. This helps reduces future print defects before they happen; improving print quality, reducing rework cost, wasted consumables, and defective products.
The PV system can be easily integrated to existing production lines and works well for all types of printed products (twisted pair, jacketed, bare wires, and convoluted profiles). The system can analyze print legends from any type of printing method such as hot foil, inkjet, laser, and gravure printing.
Maintenance on the unit involves a quick wipe when the unit is dusty. The lifetime of the lights can be over 50,000 hours of usage and are the only consumable part in the whole system.
Current Print Inspection Techniques and Limitations
Inline Visual Inspection using Stroboscope
This type of inspection involves using a stroboscope inline. A stroboscope flashes light at the proper period, making the print legend appear to slow moving or stationary. This allows the operator to verify the existence or quality of the print. However, there is often insufficient time to thoroughly inspect length print messages. This method is also sample based, which means that lengthy sections of product are not inspected. Additionally, the flashing strobe lights can be a nuisance to the operator.
Offline Viewing through Magnifying Lens
Another sample-based technique to detect print defects is having operators inspect the print manually through a magnifying glass. Although the operator can see the individual print defects and categorize them accordingly, this method is limited to small portions of the total product length. It can also only be used up to a relatively slow speed, so is usually only used for customers who require it. As print legends can be lengthy, there is a high chance of human error during the inspection. The repeatability of this method is also limited as each operator makes a judgement call of what is considered ‘bad’ print.
Image Capture and Sampling
This process involves a camera acquiring an image based on an encoder signal and a set sampling rate. Captured images are then shown on a display for operators to assess if there are any print defects. This method has several of the same limitations as stroboscope and offline inspection. Fatigue, operator’s individual judgments, and slower processing speed all reduce the effectiveness of image capture and sampling. The possibility of missing print defects is also fairly high, depending on operator attentiveness and the sampling rate.
Machine Vision Inspection System
Optical Mechanical Design
The print verification system (Figure 1) consists of a camera and focused LED lighting to capture images of print legends moving at speeds more than 1400 feet (500 meters) per minute. Multi-camera systems are used for lines where the product has multiple faces with print.
The camera and lens continuously capture images of the entirety of every print legend (Figure 2). Image capture is synchronized with the printer timing and line speed. The captured image are used for further software processing.
Lighting setups can be customized depending on the application. Factors considered include reflectivity of the surface material, surface profile, color, line speed, and lens aperture.
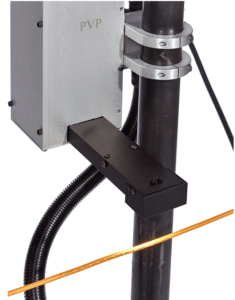
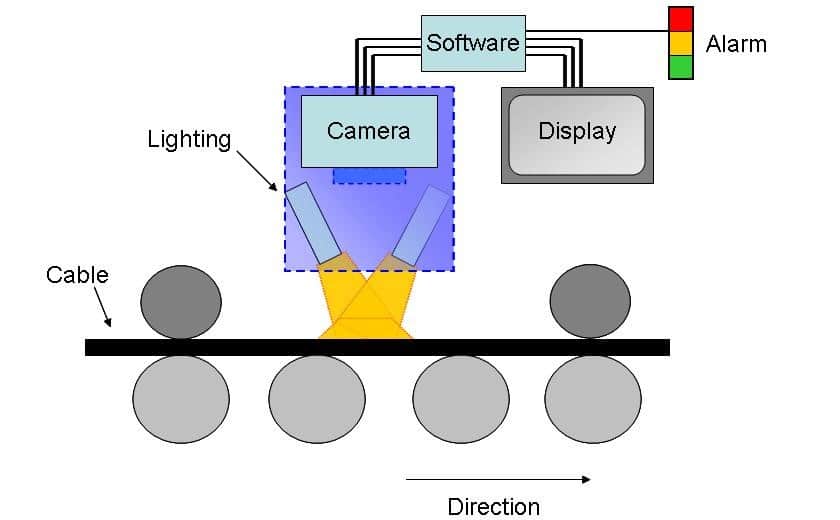
One historical challenge for print inspection is ensuring print stays within the camera’s field of view. The PV handles this with anti-twist hardware and customized software to straighten cable images and align print messages. Advanced algorithms are used to process the captured images of print to inspect for print defects.
Improving Quality Assurance
Suitable for any Type of Product
Using specialized lighting and machine vision, the PV system can inspect print legends on any type of product. With proper set-up the system can be used on wires, cables, pipes, tubes, tapes, flat sheets and more.
Suitable for any Type of Printers/ Fonts
Each PV system uses captured images of good print as a reference. This allows the system to be used to inspect print from any type of printer. The PV software is able to compare print legends to references from any type of printer, including inkjet, inkwheel, hot foil, and laser printers. As long as there is print, the PV can be used for inspection.
Reduce Defects On-The-Fly
The PV system provides the operator with a view of the current print legend as well as the most recent print defects. This continuous stream of real time information – especially failure data – allows operators to isolate the causes of print defects while production lines are still running. If the print quality degrades below the set threshold, the alarm alerts operators, who can immediately intervene to improve the print quality. Operators can use the PV system at the beginning of runs to set-up printers and assess if to ensure the print legend is correct and of good quality. The real-time nature of the PV system allows changes to be made on the fly, greatly reducing costs from post-production reprinting.
Quality Assurance
The PV system captures images of printed legends at high line speeds, saving all images of print defects for use in quality reports. The display makes it easy for operators or engineering and production supervisors to examine defects without having to view the defect on the actual product itself – saving significant amounts of time. Defect images are saved together with location information, allowing corrective action to be taken accurately and efficiently.
Limitations
There are a few limitations to the print verification system.
- Different types of cable surfaces (round/ twisted profile), or different fonts may cause the same legend to appear different. Therefore, after significant line changes, a new reference should be taken to ensure accurate assessment of print quality.
- As the camera captures images of the product surface, if water droplets or grease or dust particles are present on top of the print legend the print quality may appear low and trigger an alarm. This can be avoided by proper positioning of the system in-line and by maintaining a clean, dry product.
Test Results
Taymer’s Print Verification System has been tested and used extensively on many different types of products, with a wide range of print messages, and inspecting print from various types of printers. In studies performed on real production lines, the implementation of PV systems was found to reduce the occurrence of print defects by over 50%.
The reasons are as follows:
- Minor print quality issues are caught before they became an actual defect. These are corrected by the operator adjusting the printer or fixing cable alignment.
- Printer maintenance can be initiated before printers malfunction as operators receive real time feedback on print quality.
- Incorrect print legends are identified before entire runs are misprinted.
Sample Images
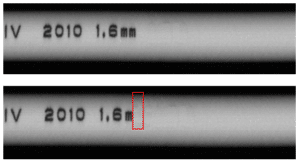
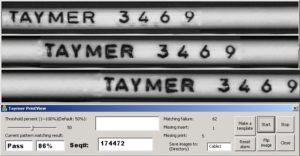
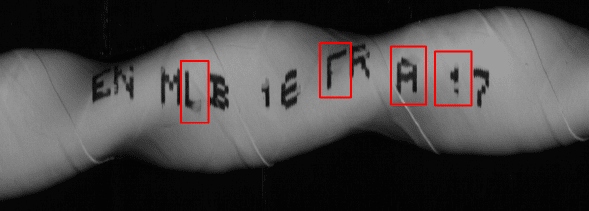
Below are sample images or screenshots (Figure 3-5) of print defects found by the PV optical system on different products.

Conclusions
With the Print Verification System, print legends on the wire and cable can be inspected thoroughly for defects. The system provides several benefits.
- Suitable for any type of products – wire/ cable/ hose/ pipes/ bars/ plates/ stranded product
- Suitable for any type of printer – inkjet, ink wheel, hot foil, laser, etc.
- Ensures end customers do not receive defective products, improving customer relationship and confidence
- Reduces reprinting and eliminates consumable waste resulting in material cost and labor cost savings
- Assists in internal process improvements to reduce future defects
Contact us today if you would like to discuss Taymer’s Cable Print Verification technology further.


